
Practical Advice from a Licensed Veterinarian
I’m a licensed small-animal veterinarian who spends a surprising amount of time talking about cars — not engines, but carriers, seat belts, and how cats ride safely. I’ve seen the aftermath of poorly secured carriers, and I’ve also seen how calm a cat can be when a carrier is properly positioned and fastened. The difference is not theoretical to me; it’s played out in my exam room more times than I can count.
Why securing the carrier actually matters.
Cats don’t just “sit still.” Even the calm ones can panic with a sudden horn, a pothole, or a quick brake. A loose carrier becomes a projectile in a crash, and even in a minor stop, it can tip, roll, or slam into a seatback. I once treated a cat whose plastic carrier had slid off a seat during a short suburban drive; nothing broke, but the bruise and the fear stuck around for weeks. The owner told me the trip was just ten minutes. Short trips don’t make physics kinder.
Choose the right spot in the car.
My strongest professional recommendation is the back seat. It offers the best balance of distance from airbags and stability from the seat structure.
I advise against the front seat, even if it feels “closer” and reassuring. Airbags that save humans can seriously injure a cat in a carrier. I saw this firsthand after a fender-bender in which the airbag didn’t even fully deploy, but it hit the carrier edge-on. The cat survived, but the injuries were far worse than the minor crash would suggest.
The floor behind the front seats can be a good option if the carrier fits flat and doesn’t wobble. It’s not glamorous, but it’s very stable, and nervous cats often relax in the darker, lower space.
How to actually secure the carrier
The most common question I get is, “Do I just buckle it in like a person?” The answer: usually yes, but only if the carrier allows it.
For most hard-sided carriers, the seat belt can be routed over the top or through purpose-built slots in the plastic. If your carrier has those slots, use them — they exist for a reason. I’ve noticed owners often miss them because they’re subtle and blend into the design. A belt snugly threaded through those points dramatically reduces carrier movement during braking.
If your car has ISOFIX/LATCH anchors and your carrier is designed to clip to them, that’s even more secure. If the airline isn’t designed for that, don’t improvise straps to “make it work.” I’ve seen well-intentioned homemade systems fail under nothing more than a sharp turn.
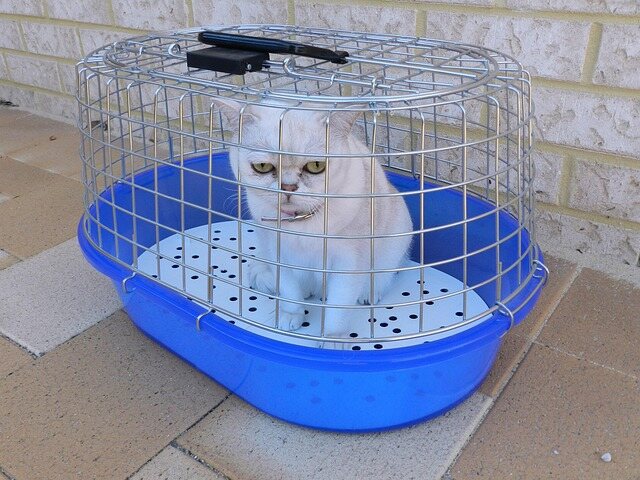
Soft-sided carriers are trickier. They’re comfortable but can collapse or twist under strain. If you use one, wedge it firmly in the back seat corner and use the seat belt to cinch it tight. I’ll be honest: I prefer sturdy hard carriers for car travel and tell my clients that directly. They protect better in unpredictable situations.
Keep the carrier level stable
One thing people don’t realize until they ride in the back seat themselves is how sloped the seats are. A carrier perched on an angled seat can tip forward. I’ve stopped mid-exam more than once to help an owner adjust their setup after they mentioned their cat “kept sliding forward the whole ride.”
Filling the seat dip with a folded towel or small blanket can level the carrier and reduce vibration. It’s not about cushioning as much as stability. A level surface keeps your cat oriented and less nauseous.
Prevent the “bolt out of the door” moment.
An unsecured carrier is only half the risk; an unsecured cat is the other half.
One spring afternoon, a client opened the car door in the car park before fully closing the car door “just to check on her.” The cat shot out, terrified, and hid in nearby shrubs for hours. We eventually got her back, but it was avoidable. Secure the carrier first, secure the car environment second, then open anything.
I strongly recommend locking the carrier door properly and using carriers with reliable metal latches. Zippered soft bags can open just enough for a paw or head to force the rest open under stress.
Common mistakes I see all the time
I’ve lost count of how many times I’ve heard, “I’ll just hold the carrier on my lap.” Please don’t. You can’t physically restrain it against crash forces, and your own body becomes part of the impact.
Another frequent mistake is placing the carrier sideways because it “fits better.” That changes how the cat braces itself, increasing motion sickness. Forward-facing or rear-facing on a stable surface works best.
And yes, cardboard boxes and laundry baskets with towels really do walk into my practice sometimes. They are fine for carrying sweaters, not living animals. Cardboard softens, handles tears, and cats chew their way out faster than people expect.
A quick word about helping anxious cats
Properly securing the carrier also reduces stress. A carrier that tilts or wobbles makes cats car-sick and fearful. I’ve had long-term patients who went from screaming through every car ride to riding quietly once their carrier was anchored and partially covered to block motion outside the windows.
I’ve found that placing the carrier so the door doesn’t directly face a window also helps. They don’t need a highway view; they need predictability.
My bottom-line recommendation
From my professional experience, the safest setup is:
Hard-sided carrier, back seat placement, seat belt threaded through built-in slots or firmly cinched, carrier level and wedged so it cannot tip, airbags far away.
Everything else I see people try is a variation moving away from that standard, often for convenience, and the risks increase as they do.
Cats don’t get to choose how they travel. We do that for them. A few extra minutes securing the carrier can be the difference between a routine ride and an emergency visit like the ones I still remember too clearly from past cases.